⚡ Gear Enhancement Guide
Master the art of upgrading your equipment🔧 Enhancement System Overview
The Enhancement System allows you to upgrade your gear to increase its power level from +1 to +15. Each enhancement level provides significant stat boosts, making properly enhanced gear crucial for endgame content.
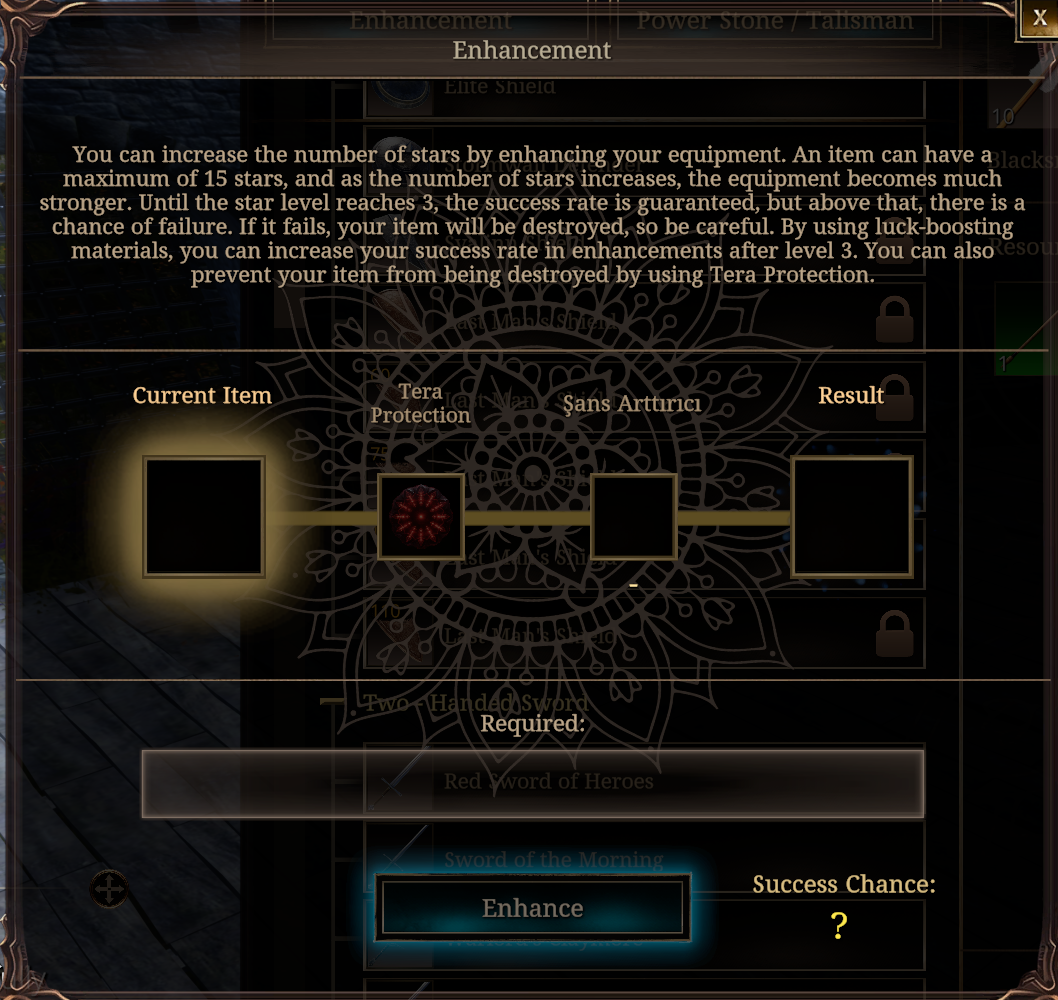
Enhancement Window Interface
✅ Safe Enhancement (+1 to +3)
- 🎯 Success Rate: 100% guaranteed
- 💰 Materials: Basic enhancement materials only
- ⚡ Risk: None - always succeeds
- 📈 Recommendation: Always enhance to +3 immediately
⚠️ Risky Enhancement (+4 to +10)
- 🎯 Success Rate: Decreases with each level
- 💰 Materials: Requires quality materials
- ⚡ Risk: Item may be destroyed on failure
- 🛡️ Protection: Use Tera Protection to prevent destruction
💥 High Risk (+11 to +15)
- 🎯 Success Rate: Very low chance
- 💰 Materials: Premium enhancement materials
- ⚡ Risk: High chance of item destruction
- 🌟 Reward: Massive stat increases
🏭 Enhancement Stations
Different types of gear require specific crafting stations for enhancement. Make sure to use the correct station for your equipment type.
Blacksmith's Forge
Used For:
- ⚔️ All Weapons
- 🛡️ Heavy Armor (Plate)
- 🔨 Shields
Loom (Tailoring Station)
Used For:
- 👕 Light Armor (Leather)
- 👘 Robe Armor (Cloth)
- 🧤 Cloth Accessories
Jewelcrafting Bench
Used For:
- 💍 Rings
- 📿 Necklaces
- 👂 Earrings
📦 Enhancement Materials
🔨 Basic Enhancement Materials
- Volcanic Stone: Primary enhancement material
- Elemental Stone: Enhanced quality material
- Ghost Fragment: Spirit-based enhancement material
- Soul Fragment: Advanced spirit material
- Enchanted Talisman: Magical enhancement component
- Gold: Enhancement costs increase with each level
🛡️ Protection Materials
- Tera Protection: Prevents item destruction on failure (essential for +4 and above)
- Backup Gear: Keep duplicates for high-risk enhancements
📿 Talisman System
Talismans are special enhancement components that provide powerful set bonuses when added to your gear. Each gear set has corresponding talismans that unlock unique abilities.
How Talismans Work
- 📿 Application: Added at crafting stations during enhancement
- 🎯 Set Specific: Must match your gear set for bonuses
- 🔮 Set Bonuses: Activate when wearing multiple pieces
- ⚡ Consumption: Burns on enhancement failure (but item is safe)
Talisman Types by Gear Set
- Sovereign's Legacy Set: Royal power talisman
- Ravager's Dominion Set: Aggressive combat talisman
- Divine Aegis Set: Holy protection talisman
- Tempestbound Set: Elemental storm talisman
- Bladeweaver Set: Weapon mastery talisman
- Spellfire Set: Magic flame talisman
- Astral Conflux Set: Cosmic power talisman
- Seraphic Grace Set: Angelic blessing talisman
- Fortress of Valor Set: Defensive might talisman
- Dragonclaw Set: Dragon power talisman
- Eldritch Catalyst Set: Arcane amplification talisman
- Divine Harmony Set: Balanced divine talisman
⚠️ Important: Talismans are consumed on enhancement failure, but your item remains safe if you use Tera Protection. Plan your enhancement attempts carefully and stock up on talismans before pushing high enhancement levels.
💠 Power Stone System
Power Stones are enhancement components that add specific stat bonuses to your gear. Unlike talismans which provide set bonuses, power stones give direct stat increases.
How Power Stones Work
- 💠 Application: Added at crafting stations during enhancement
- 📊 Direct Stats: Provide specific stat bonuses (AP, DP, HP, etc.)
- ⚔️ Customization: Choose stones based on your build needs
- ⚡ Consumption: Burns on enhancement failure (but item is safe)
- 🔄 Flexibility: Can be changed between enhancement attempts
- 📈 Scaling: Higher tier stones provide larger bonuses
Power Stone Types
- Power Stone [Physical Attack]: Increase physical attack power
- Power Stone [Magic Attack]: Increase magic attack power
- Power Stone [Physical Defense]: Increase physical defense
- Power Stone [Magic Defense]: Increase magic defense
- Power Stone [HP]: Increase maximum health
- Power Stone [MP]: Increase maximum mana
- Power Stone [HP Regeneration]: Increase health recovery rate
- Power Stone [MP Regeneration]: Increase mana recovery rate
- Power Stone [Accuracy]: Increase attack hit chance
- Power Stone [Evasion]: Increase attack dodge chance
- Power Stone [Critical Chance]: Increase critical hit chance
- Power Stone [Critical Defense Chance]: Reduce critical damage taken
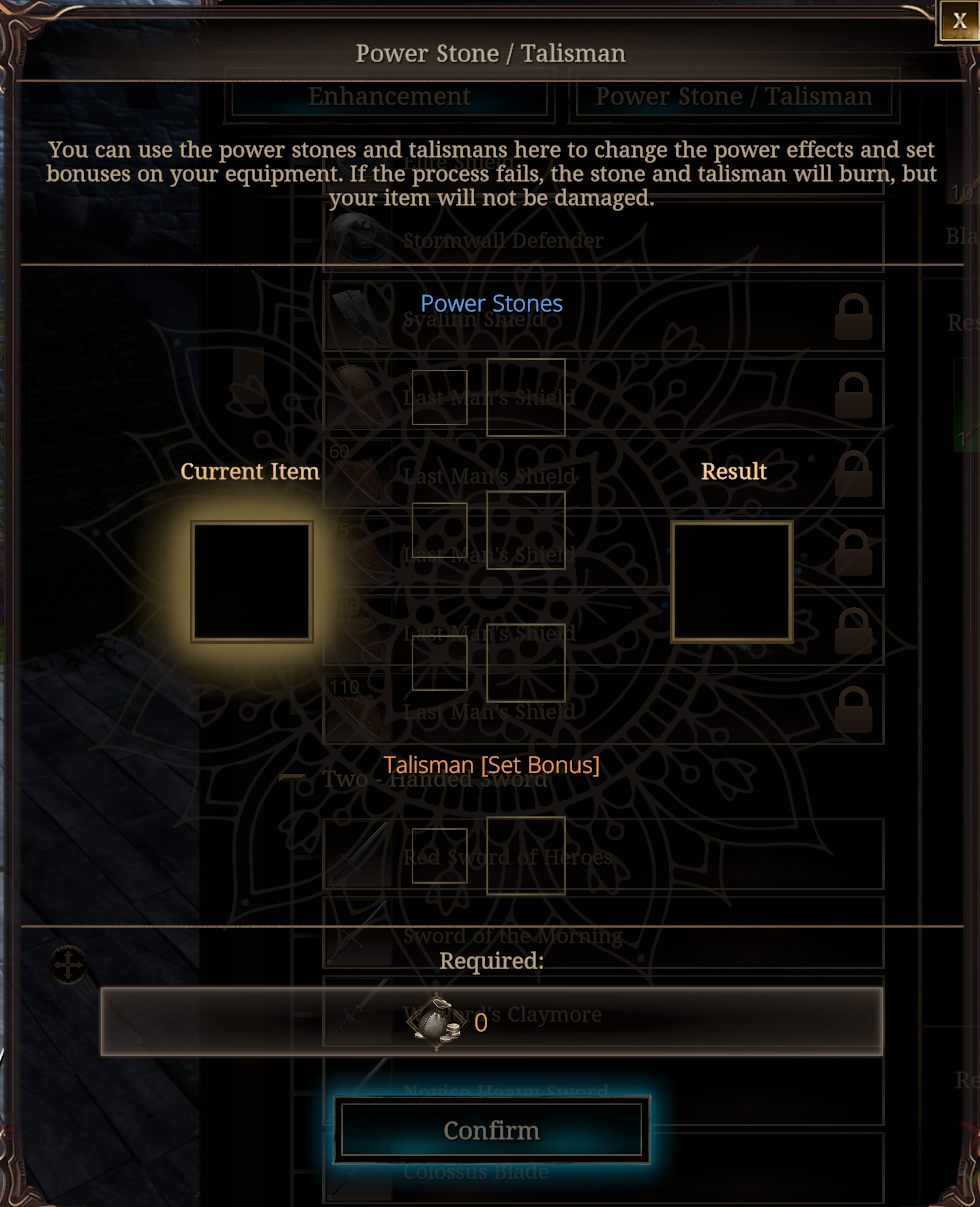
Adding Power Stones and Talismans to Equipment
💡 Strategy Tip: Power stones are consumed on failure, so use lower-tier stones for risky enhancement attempts. Save premium stones for final enhancement levels or gear you're confident about.
📋 Enhancement Strategy Guide
✅ Best Practices
- 🎯 Always enhance to +3: It's guaranteed, so there's no reason not to
- 🛡️ Use Tera Protection: Always protect items from +4 onwards
- 📦 Stock materials: Have backup talismans and power stones ready
- 💰 Budget wisely: Enhancement can be expensive at higher levels
- ⚖️ Priority order: Enhance weapon first for maximum damage increase
- 🎲 Know when to stop: Don't push +15 unless you have resources to spare
- 🔄 Enhance sets together: Keep gear at similar levels for balanced stats
- 📊 Track success rates: Understand the odds before attempting
❌ Common Mistakes to Avoid
- 💥 Enhancing without protection: Always use Tera Protection +4 and above on gear score 350+
- 🎰 Gambling addiction: Don't keep trying after multiple failures
- 💸 Using premium materials early: Save best talismans/stones for higher levels
- ⚔️ Ignoring weapon priority: Weapon enhancement gives biggest power spike
- 🏃 Rushing to +15: Each gear piece at +10 is better than one at +15
- 📉 Enhancement without funds: Ensure you have gold for repairs and attempts
- 🎯 Wrong power stones: Match stones to your build (don't add Magic AP to melee)
- 🔄 Enhancing wrong gear: Don't waste materials on gear you'll replace soon
📊 Enhancement Success Rates
While exact success rates may vary, understanding approximate chances helps you make informed decisions:
| Enhancement Level | Approximate Success Rate | Risk Level | Recommendation |
|---|---|---|---|
| +1 | 100% | None | Always enhance |
| +2 | 100% | None | Always enhance |
| +3 | 100% | None | Always enhance |
| +4 | ~50-60% | Low | Use protection, safe to attempt |
| +5 | ~35-42% | Low | Use protection, safe to attempt |
| +6 | ~15-18% | Medium | Use protection, consider backup materials |
| +7 | ~8-12% | Medium | Use protection, have backup materials |
| +8 | ~5-8% | High | Use protection, expensive attempts |
| +9 | ~3-5% | High | Use protection, very expensive |
| +10 | ~2-4% | Very High | Major investment required |
| +11 | ~1.5-3% | Very High | Only for endgame gear |
| +12 | ~1-2% | Extreme | Only for endgame gear |
| +13 | ~0.7-1.5% | Extreme | Only for endgame gear |
| +14 | ~0.5-1% | Extreme | Whale territory |
| +15 | ~0.3-0.7% | Extreme | Maximum power, maximum cost |
⚠️ Note: These are approximate rates based on community data. Actual rates may vary and are not officially published. Success rate boosting items may be available in-game.
💰 Enhancement Cost Analysis
Budget Enhancement (Recommended)
- Target: All gear at +7 to +8
- Cost: Moderate investment
- Benefit: 70-80% of maximum potential power
- Risk: Manageable with Tera Protection
- Timeline: Achievable within weeks of farming
- Viability: Competitive in most content
Premium Enhancement (Endgame)
- Target: All gear at +12 to +15
- Cost: Massive investment
- Benefit: 100% maximum potential power
- Risk: Extremely high material consumption
- Timeline: Months of dedicated farming or real money
- Viability: Required for top-tier competitive content
💡 Smart Enhancement Path
- Enhance all gear to +3 (guaranteed, cheap)
- Enhance weapon to +7 first (biggest damage increase)
- Enhance armor pieces to +5 (balanced defense)
- Push weapon to +10 if materials allow
- Bring all armor to +7
- Only push beyond +10 on gear you'll use long-term